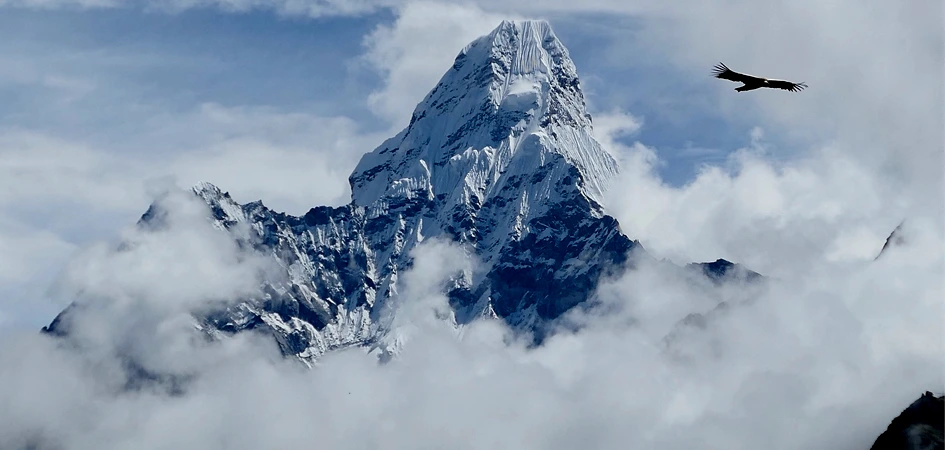
The Ama Dablam Expedition begins with a midnight overland transfer from Kathmandu to Ramechhap (Manthali), usually departing between 1:00 and 2:00 AM from Thamel, or sometimes as early as 9:00 PM during peak or post-monsoon travel disruptions. The 130 km drive follows the BP Highway along the Sunkoshi River, taking around 4–5 hours in a shared bus or private jeep, often on winding mountain roads in complete darkness, with arrival timed for sunrise at Manthali Airport. From there, trekkers take a short but spectacular 15–20-minute STOL flight to Lukla (2,840m), flying on small aircraft like the Twin Otter or Dornier with strict baggage limits, where seating on the left offers the best Himalayan views before landing on the famously steep runway. After landing, the trek begins with a gentle 3–4-hour descent to Phakding (2,610m), passing through Sherpa villages, pine forests, mani walls, and prayer flags along the Dudh Koshi River, crossing suspension bridges and traditional settlements before reaching a riverside teahouse for the first night in the Khumbu region.
Transfer: 128 km, 4-5 min |
Flight: 15 min |
Walk: 3-4 Hours |
Distance: 8 km |
Altitude Gain: 170 m |
Altitude Loss: 390 m |
Accommodation: Lodge I
Meal: Breakfast, Lunch, Dinner
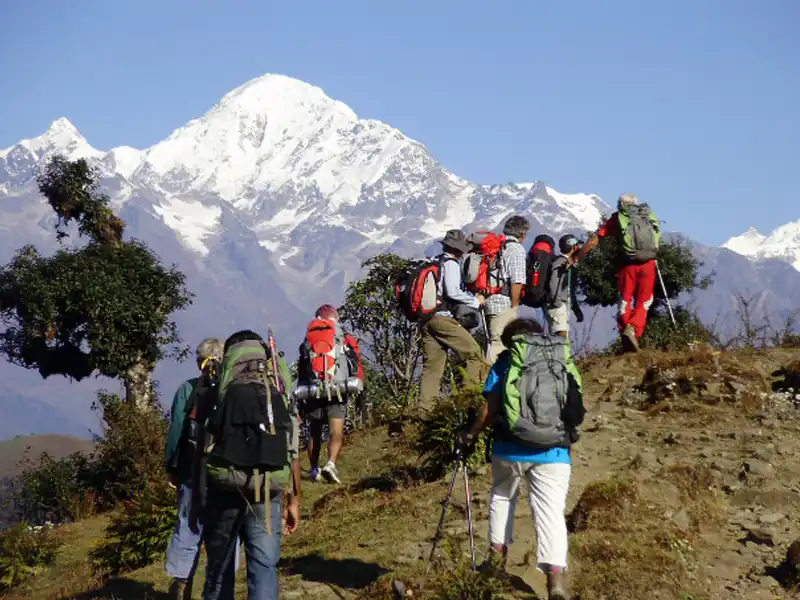
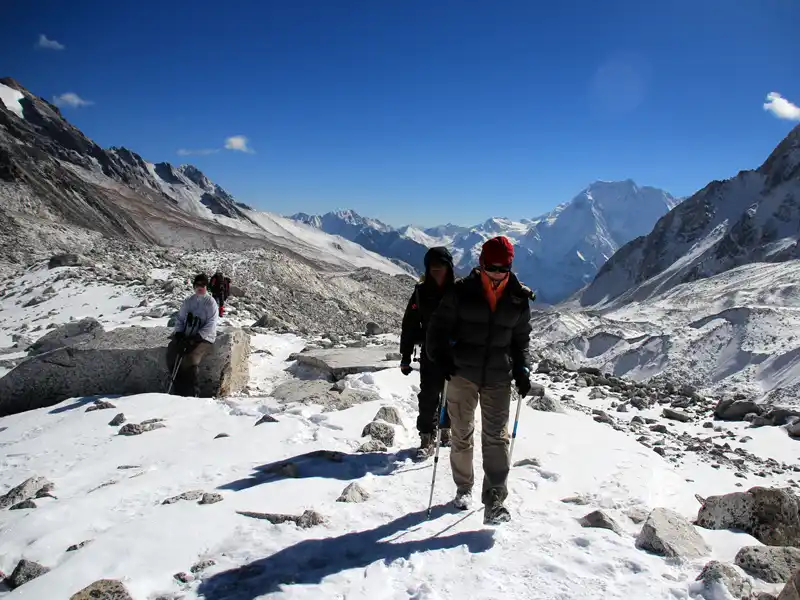
After breakfast in Phakding, the trek begins with a scenic walk along the Dudh Koshi River, following the picturesque “Waterfall Route” past the cascading falls of Benkar and the lush orchards of Chumoa before reaching Monjo, the gateway to Sagarmatha (Everest) National Park. Continuing north through Jorsale, the last village before the climb, you’ll cross vibrant, prayer-flag-draped suspension bridges spanning the Dudh Koshi and Bhote Koshi rivers, including the iconic Hillary Bridge at their confluence. From here, the legendary two-hour Namche ascent begins—a challenging uphill trek through fragrant pine forests that rewards trekkers with their first glimpse of Mount Everest from a hidden viewpoint along the trail. Covering approximately 10.5 km (6.5 miles) in about five hours, this breathtaking journey through the heart of the Khumbu culminates in Namche Bazaar, the vibrant “Sherpa Capital,” a natural mountain amphitheater known for its bustling Saturday market, modern bakeries, trekking gear shops, and rich Himalayan traditions set beneath the towering peak of Thamserku.
Walk: 5-6 Hours |
Distance: 10.5 km |
Altitude Gain: 930 m |
Altitude Loss: 150 m |
Accommodation: Lodge l
Meal: Breakfast, Lunch, Dinner
The day’s acclimatization hike begins with a steep, zig-zagging ascent from Namche Bazaar toward Syangboche Airstrip at 3,720 m, where the dramatic peaks of Thamserku and Ama Dablam come into full view. Continuing to the iconic Everest View Hotel, enjoy unobstructed panoramas of Everest, Lhotse, and Ama Dablam, traditionally savored over a cup of lemon tea on the terrace. The trail then descends through the serene "Green Valley" to Khumjung village, where you can visit the Hillary School, see the legendary “Yeti scalp” at the local monastery, and savor a traditional Sherpa potato lunch. The scenic return path skirts the mountainside for an easy descent back to Namche, leaving a free afternoon to relax at a local bakery or the world’s highest Irish pub. The hike not only aids acclimatization, helping prevent altitude sickness, but also immerses trekkers in Sherpa culture while offering breathtaking Himalayan views.
Walk: 5-6 Hours |
Distance: 9 km |
Altitude Gain: 550 m |
Altitude Loss: 550 m |
Accommodation: Lodge l
Meal: Breakfast, Lunch, Dinner
After breakfast in Namche, the trek begins with a steep climb out of the village, leading to a beautiful ridge trail toward Sanasa. Trekkers are rewarded with stunning panoramic views of Ama Dablam, Mount Everest, Lhotse, and the towering peaks of Thamserku and Kangtega. The wide cliffside path meanders through forests where Himalayan tahr and Nepal's national bird, the colorful Danphe, can often be seen. From Sanasa, the trail descends steeply through rhododendron and pine forests to the riverside settlement of Phunki Thenga, a popular lunch stop beside the rushing Imja Khola. After crossing the suspension bridge, the most challenging part of the day begins with a long, steep uphill climb through dense forests of pine, fir, and rhododendron toward Tengboche. The thinning air makes a slow and steady pace essential. At the top, trekkers pass through a stone gateway into the sacred grounds of Tengboche Monastery, the largest and most important monastery in the Everest region. Surrounded by forests and breathtaking mountain scenery, the monastery offers visitors a chance to observe monks performing traditional prayers amid golden Buddha statues, colorful thangka paintings, and the scent of incense. From the ridge at Tengboche, the sunrise and sunset views over Ama Dablam, Everest, Nuptse, and Lhotse create one of the most unforgettable panoramas in the Himalayas.
Trekking: 4-6 Hours |
Distance: 10 km |
Altitude Gain: 790 m |
Altitude Loss: 360 m l
Accommodation: Lodge I
Meal: Breakfast, Lunch, Dinner
After breakfast in Tengboche, the trek begins with a series of distinct and scenic stages. It starts with a peaceful 30 to 45-minute descent through the enchanting forests of rhododendron, birch, and fir, leading from Tengboche to Debuche. This serene atmosphere, often shared with Himalayan Monals and musk deer, features moss-draped trees, soft forest trails, and seasonal wildflowers. From Debuche, the route continues for about 45 minutes along a gentle riverside path beside the Imja Khola. Along the way, trekkers pass the quiet Debuche Nunnery as the treeline thins, revealing the towering face of Ama Dablam dominating the skyline. The trail soon leads to a dramatic suspension bridge over a deep gorge. After crossing the bridge, the landscape shifts sharply into an exposed alpine zone. A steady ascent of 45 minutes to an hour leads to Lower Pangboche along dusty switchbacks lined with juniper and stone-walled fields. Due to the altitude near 4,000 meters, trekkers should maintain a slower pace while enjoying sweeping views of the surrounding peaks, such as Kantega and Thamserku. The final short climb of 20 to 30 minutes brings trekkers to Upper Pangboche, the historic heart of the village. Here, ancient stone homes, sacred cedar groves, and the centuries-old Pangboche Monastery reflect the deep Sherpa Buddhist heritage, including legends of the Yeti relics once kept there. This makes Pangboche both a cultural highlight and a key acclimatization stop on the route toward Ama Dablam Base Camp.
Trekking: 3-5 Hours |
Distance: 4 km |
Altitude Gain: 200 m |
Altitude Loss: 120 m l
Accommodation: Lodge I
Meal: Breakfast, Lunch, Dinner
After breakfast in Pangboche, the trek begins with a steady descent through the stone-walled labyrinth of the village, dropping along dusty agricultural trails past terraced fields of potatoes, barley, and buckwheat before reaching the roaring Imja Khola, where a high steel suspension bridge at around 3,780m marks the valley floor and gateway into higher alpine terrain. Immediately after crossing, the route transforms into a demanding ascent through a series of steep, dusty switchbacks known as the ridge climb, where sub-alpine vegetation quickly disappears and is replaced by harsh alpine tundra of juniper scrub and mountain grass; here, slow and rhythmic pacing (“Bistari, Bistari”) becomes essential as the trail gains altitude and sweeping views open behind you toward the towering walls of Tawoche and Cholatse. After several hours of sustained climbing, the ridge finally crests and the landscape suddenly flattens into the vast alpine amphitheater of Ama Dablam Base Camp, where the mountain’s dramatic southwest face dominates the skyline and the environment shifts between quiet wilderness and seasonal expedition activity, including organized tented camps, climbing infrastructure, and a central Puja altar where climbers receive blessings before their ascent. At the edge of the plateau, trekkers may also find basic seasonal shelters such as the Amadablam Base Camp Lodge, offering simple refreshments like tea and garlic soup in an otherwise remote and wind-swept high-altitude setting beneath Ama Dablam.
Trekking: 3-5 Hours |
Distance: 4 km |
Altitude Gain: 610 m |
Altitude Loss: 20 m l
Accommodation: Lodge I
Meal: Breakfast, Lunch, Dinner
Acclimatization is the gradual process by which the body adapts to low oxygen at high altitude, and at Ama Dablam Base Camp (around 4,600m), where oxygen levels are roughly 57% of sea level, climbers must adjust before attempting higher sections of the mountain. The main strategy is “climb high, sleep low,” in which climbers hike to higher elevations during the day to stimulate adaptation, then return to base camp to rest and recover. During this period, Base Camp also functions as a training ground where climbers practice essential technical skills such as using a Jumar on fixed ropes, safely passing anchors, rappelling with devices like an ATC or figure-eight, and walking on rock with crampons to prepare for mixed ice-and-rock terrain. At the same time, the body is undergoing important physiological changes, including increased breathing rate, production of red blood cells through erythropoietin (EPO), and adjustments in blood chemistry, while strict hydration of 4–5 liters per day is essential to compensate for fluid loss and support safe acclimatization.
Accommodation: Lodge I
Meal: Breakfast, Lunch, Dinner
Acclimatization at Ama Dablam Base Camp (4,600m) is the process of helping the body adapt to reduced oxygen levels, where the air contains only about 57% of sea-level oxygen, using the “climb high, sleep low” method in which climbers hike to higher elevations during the day and return to Base Camp to recover and sleep. During this phase, the body undergoes important changes such as increased breathing rate, higher red blood cell production through erythropoietin (EPO), and improved oxygen transport. Climbers also follow strict daily monitoring using oxygen saturation (SpO₂) readings and symptom checks to detect early signs of altitude sickness like AMS. Base Camp serves as a fully organized recovery and training hub where climbers drink 4–5 liters of fluids daily, eat high-calorie meals like dal bhat, soups, and carbohydrates, and rest in insulated tents or a communal dining dome to support recovery and energy restoration. Alongside rest, climbers practice essential technical skills on nearby terrain, including fixed-rope climbing with a Jumar, safe passage of anchors and knots, controlled rappelling with backup systems, and crampon technique on mixed rock and ice, ensuring full preparedness for the demanding sections higher on the mountain.
Accommodation: Lodge I
Meal: Breakfast, Lunch, Dinner
After breakfast at Base Camp, the climb to Camp I begins, marking the transition from a comfortable alpine meadow to the rugged terrain of high-altitude mountaineering. The route gains around 1,100 meters in elevation, following steep but non-technical moraine trails along the Camel Back Ridge before reaching Advance Base Camp (ABC) at approximately 5,400 meters. After a short rest to hydrate, adjust layers, and prepare equipment, climbers continue into more demanding terrain where the trail gives way to large boulder fields, granite slabs, and sections of fixed rope that require careful scrambling. As the ascent progresses above 5,500 meters, the thinner air makes every step more challenging, making slow and steady pacing essential for conserving energy. Staying well hydrated is equally important to help the body cope with the cold, dry conditions and altitude. After several hours of climbing, climbers reach Camp I at 5,700 meters, a small and exposed campsite perched on narrow rock ledges along Ama Dablam’s Southwest Ridge, offering spectacular views and a first real taste of the mountain’s technical environment.
Climbing: 6-8 Hours |
Distance: 6 km |
Altitude Gain: 1,210 m |
Altitude Loss: 0 m l
Accommodation: Lodge I
Meal: Breakfast, Lunch, Dinner
After spending the night at Camp I, climbers continue a demanding ascent along the exposed Southwest Ridge toward Camp II, staying fully attached to fixed ropes with Jumars and safety tethers. The route begins with steep scrambling over granite ridges with big drop-offs on both sides, requiring careful and steady movement. Higher up, climbers reach the Yellow Tower, a near-vertical 15-meter granite wall that is one of the most technical sections of the lower mountain, where they climb using fixed ropes, precise foot placement, and efficient use of ascenders. Above this section lies Camp II at around 6,100 meters, a very small and exposed campsite on narrow rock ledges high above the valleys, where climbers briefly rest, hydrate, and adjust to the altitude during acclimatization rotations. The descent is equally focused, with climbers rappelling carefully down the Yellow Tower and other steep sections before returning through Camp I and Advance Base Camp. From there, the route continues down loose scree, boulder fields, and moraine trails back to Base Camp, where thicker air, warmer temperatures, and a more comfortable environment allow for proper recovery before the next phase of the expedition.
Climbing: 4-8 Hours |
Distance: 1 km |
Altitude Gain: 120 m |
Altitude Loss: 0 m l
Accommodation: Lodge I
Meal: Breakfast, Lunch, Dinner
A rest day at Ama Dablam Base Camp follows a simple but structured routine focused on recovery, nutrition, and preparation for higher climbs. In the morning, climbers stay in their sleeping bags until the sun warms the camp, then gather in the dining dome for a high-calorie breakfast of porridge, eggs, potatoes, and bread, helping replenish the energy burned at altitude. Some time is also used for basic hygiene, including warm “solar showers,” which help maintain cleanliness and morale. In the afternoon, activity stays light as climbers rest in the sun, dry and maintain their gear, and follow a strict hydration routine of 4–5 liters of fluids through water, tea, and soups to prevent dehydration and altitude sickness. As evening approaches, temperatures drop quickly, and everyone moves back into the dining dome for medical checks, where oxygen saturation and heart rate are monitored along with symptoms of altitude sickness. The day ends with a weather briefing over dinner, where guides review forecasts, wind conditions, and summit planning updates, ensuring the team is physically recovered and strategically prepared for the next climbing rotation.
After breakfast at Base Camp, the climb to Camp I begins, marking the transition from a comfortable alpine meadow to the rugged terrain of high-altitude mountaineering. The route gains around 1,100 meters in elevation, following steep but non-technical moraine trails along the Camel Back Ridge before reaching Advance Base Camp (ABC) at approximately 5,400 meters. After a short rest to hydrate, adjust layers, and prepare equipment, climbers continue into more demanding terrain where the trail gives way to large boulder fields, granite slabs, and sections of fixed rope that require careful scrambling. As the ascent progresses above 5,500 meters, the thinner air makes every step more challenging, making slow and steady pacing essential for conserving energy. Staying well hydrated is equally important to help the body cope with the cold, dry conditions and altitude. After several hours of climbing, climbers reach Camp I at 5,700 meters, a small and exposed campsite perched on narrow rock ledges along Ama Dablam’s Southwest Ridge, offering spectacular views and a first real taste of the mountain’s technical environment.
Climbing: 6-8 Hours |
Distance: 6 km |
Altitude Gain: 1,210 m |
Altitude Loss: 0 m l
Accommodation: Lodge I
Meal: Breakfast, Lunch, Dinner
The transition from Base Camp I to Camp II is one of the most important and demanding stages in high-altitude mountaineering, as climbers leave the relative safety of Base Camp and enter more technical, exposed mountain terrain. The route often involves glaciers, steep snow slopes, and complex terrain where hazards like crevasses, icefalls, and avalanches become a constant concern, requiring climbers to move in roped teams for safety. In some areas, ladders may be fixed across wide crevasses, while steep sections require the use of fixed ropes and ascenders for secure upward movement. The elevation gain during this push can range from 500 to over 1,000 meters, with sustained slopes between 25° and 45°, making pacing and endurance essential. As altitude increases, oxygen levels effectively decrease due to lower atmospheric pressure, forcing the body to work harder with every step and increasing fatigue. Climbers must also contend rapidly changing conditions, including intense solar radiation reflected off snow, cold winds, and the risk of altitude-related illnesses like HAPE and HACE. Careful pacing, constant awareness, and efficient movement are essential to safely reach Camp II and complete this critical stage of the expedition.
The climb from Camp II to Camp III on Ama Dablam is one of the most technical and visually striking sections of the entire expedition, as the route moves from steep rock towers into exposed alpine ice and mixed terrain high on the mountain. Right after leaving Camp II, climbers face the Grey Tower, a steep wall of fractured rock and ice where fixed ropes, ascenders, and careful footwork with crampons are essential for safe progress. Beyond this, the route leads onto the narrow and exposed Mushroom Ridge, a sharp snow arête with dramatic drops on both sides, demanding slow, precise movement and constant balance on fragile snow features. At this altitude, around 6,300 meters, oxygen levels are only about 45% of sea level, making every step physically and mentally exhausting and requiring steady pacing and frequent recovery breaths. The main objective hazard in this section is the looming Dablam serac above, where falling ice can create serious risk, especially during warmer daylight hours. After several hours of careful climbing, teams reach Camp III, a small and exposed ledge on the upper snow slope, where tents are secured into snow anchors and climbers focus on hydration, rest, and survival in preparation for the final summit push.
Climbing: 6-8 Hours |
Distance: 6 km |
Altitude Gain: 340 m |
Altitude Loss: 0 m l
Accommodation: Lodge I
Meal: Breakfast, Lunch, Dinner
The ascent from Camp III to the summit of Ama Dablam begins with steep alpine terrain around the massive Dablam serac, where climbers move through vertical snow flutings and hard blue ice slopes angled at 40°–60° using crampons, fixed ropes, and a Jumar for steady progress. Above this, the route opens into a long, exposed snow slope leading toward the summit, which becomes less technical but extremely exhausting due to thin air. As climbers pass 6,500 meters and approach the 6,812-meter summit, oxygen levels drop to around 40% of sea level, making every step slow and requiring controlled breathing and strict pacing. The summit itself is a small, exposed ridge with wide views of Everest, Lhotse, and Makalu, but climbers stay only 15–20 minutes before beginning the descent. The way down is often more dangerous than the climb, as fatigue reduces focus while climbers rappel carefully down fixed ropes, check anchors, and descend through technical sections like the Mushroom Ridge and Grey Tower. After reaching Camp II at 5,900 meters, climbers shift immediately into recovery, rehydrating with warm fluids, checking for frostbite, and resting in secured tents, while still using safety lines due to the exposed nature of the camp.
Climbing: 8-10 Hours |
Altitude Gain: 370 m |
Altitude Loss: 770 m l
Accommodation: Tent I
Meal: Breakfast, Lunch, Dinner
The descent from Camp II back to Base Camp is still a serious and demanding part of the expedition, even though it is downhill. Climbers leave Camp II early in the morning to use firmer snow and safer conditions, then begin a long return through changing terrain that becomes gradually warmer and richer in oxygen. The route includes roped glacier travel, fixed-line rappels, and careful movement across steep ice where hidden crevasses, loose snow, and rockfall remain constant dangers. As they descend, climbers must control tired legs from constant braking, stay fully focused even as breathing becomes easier, and avoid losing attention, since many accidents happen on the way down. Trekking poles, steady pacing, and regular hydration help reduce strain and improve safety. Once back at Base Camp, the focus immediately shifts to recovery—removing heavy gear, drinking warm fluids, eating energy-rich food, and resting in comfortable tents while the body recovers from the stress of high altitude.
Climbing: 8-10 Hours |
Altitude Gain: 0 m |
Altitude Loss: 1,350 m l
Accommodation: Lodge I
Meal: Breakfast, Lunch, Dinner
A contingency or weather day is a built-in safety buffer that gives mountaineers the flexibility to pause their climb when facing the unpredictable dangers of high altitudes. Because mountain weather can change instantly into violent blizzards, these extra days allow teams to safely wait at a lower camp for a safe "weather window" of clear skies and low winds before pushing for the summit. Beyond surviving storms, these days are crucial for giving exhausted or sick climbers extra time to rest and acclimatize to the thin air, and they provide a vital time cushion if avalanches or shifting crevasses damage the route and require teams to rebuild ropes and ladders. Ultimately, a contingency day ensures that unexpected delays don't force a team into a dangerous, rushed situation, making flexibility the ultimate tool for survival.
Accommodation: Lodge I
Meal: Breakfast, Lunch, Dinner
Ama Dablam Base Camp clean-up is the final and important phase of the expedition, focused on restoring the high-altitude environment to its natural condition. After climbers descend and the climbing season ends, teams begin systematically dismantling tents, kitchens, communication setups, and technical storage areas. All non-essential gear, waste, and expedition materials are packed out and carried down to lower villages, as leaving anything behind on the mountain is strictly avoided to protect the fragile Himalayan ecosystem. Sherpa staff and climbers work together to sort, reduce, and transport garbage, including food waste, fuel containers, and damaged equipment. The remaining camp structures are carefully taken down, and the site is checked to ensure nothing harmful is left behind. This process not only preserves the purity of the Ama Dablam region but also reflects the strong mountaineering ethic of respecting the mountain and leaving it as it was found.
Accommodation: Lodge I
Meal: Breakfast, Lunch, Dinner
The day trek from Ama Dablam Base Camp (4,600m) down to Namche Bazaar (3,440m) is a long but rewarding descent of about 18–22 km that takes roughly 6–8 hours. It begins in the open alpine landscape below the mountain and quickly drops through rocky trails and scree slopes before crossing the Imja Khola on a suspension bridge and reaching the traditional Sherpa village of Pangboche. From there, the route continues through changing scenery, moving into forests of rhododendron, pine, and birch as it passes Deboche and climbs gently up to Tengboche, home to a famous monastery with wide Himalayan views. After a break, the trail descends steeply to Phunki Tenga and then climbs again through forested switchbacks and small villages before leveling into a final scenic path that leads into the busy mountain town of Namche Bazaar, marking a return to warmer air, greenery, and comfortable teahouses.
Trekking: 7-9 Hours |
Distance: 18 km |
Altitude Gain: 500 m |
Altitude Loss: 1,570 m l
Accommodation: Lodge I
Meal: Breakfast, Lunch, Dinner
The trek from Namche Bazaar (3,440m) down to Lukla (2,860m) is a long and physically demanding day that combines steep descents, river valleys, and a final tiring climb. The journey begins with a sharp drop from Namche through forested switchbacks to the dramatic Larja Bridge, where trekkers cross high above deep river gorges and often navigate busy traffic of porters and yaks. From there, the trail continues through Monjo and Jorsalle, exiting Sagarmatha National Park and following the Dudh Koshi River toward Phakding, a common lunch stop along a path of constant “Nepali flat” ups and downs over stone steps and suspension bridges. After Phakding, the route passes small villages and terraced farmland before reaching Chheplung, where the trail begins its final challenge: a steady uphill climb over tired legs to reach Lukla. This last section is often the hardest mentally, as it comes after hours of walking, but it ends with arrival in Lukla, marking the completion of the trekking journey in the Khumbu region.
Trekking: 7-9 Hours |
Distance: 18 km |
Altitude Gain: 550 m |
Altitude Loss: 1,130 m l
Accommodation: Lodge I
Meal: Breakfast, Lunch, Dinner
The final leg of your Everest region trek takes you from Lukla to Kathmandu via Ramechhap, navigating seasonal air traffic challenges at Kathmandu’s airport. After an early breakfast, enjoy a thrilling 15-minute mountain flight from Lukla’s Tenzing-Hillary Airport to Manthali Airport in Ramechhap, offering one last breathtaking aerial view of the Himalayan peaks and deep river valleys. Upon landing, begin a scenic 4- to 7-hour drive along the B.P. Highway, following the Sunkoshi River, winding through terraced hillsides, rural villages, and farmland, providing a glimpse into daily life in the Nepalese lowlands. While the journey can be long and bumpy after weeks of trekking, arriving in Kathmandu brings the welcome comforts of a hot shower, a celebratory meal, and the satisfaction of completing the iconic Everest Base Camp trek. By late afternoon or evening, we arrive in Kathmandu and transfer to the hotel, marking the end of our Himalayan adventure.
Flight: 15 min |
Transfer: 130 km, 4-7 Hours |
Accommodation: Hotel l
Meal: Breakfast, Lunch
The Ama Dablam Expedition cost mentioned on our website is for 5 to 15 climbers in a group. This expedition can be organized as private, depending on group size and a minimum of two people, upon request. However, our cost depends upon the following:
- The Ama Dablam Expedition cost depends upon the group size
- Hotel accommodation category and client’s budget
- This trekking and expedition itinerary can be modified according to your time and requirements.
- The price shall be adjusted in our mutual understanding if the client intends to add some extra services.
- The cost is also affected by the climbing guide and an extra climbing guide.
| Trip Dates | Trip Cost | Status | Inquiry |
| USD USD 6,000 Per Climber | Book Now | Inquiry |
Cost Includes:
- Transportation : Kathmandu to Ramechhap and Ramechhap to Kathmandu on private transportation before and after the trek.
- Domestic flight Ramechhap to Lukla and Lukla to Ramechhap
- Accommodation: In a twin-sharing room at the best available guesthouse and lodges
- Meals: : 3 Meals (Breakfast, lunch, and dinner) during trekking Lukla to Base Camp and from Base Camp to Lukla,
- Permits: Sagarmatha National Park, Khumbu Rural Municipality, Climbing permit of Ama Dablam
- Staff: Climbing Mountain Guide and Base Camp Staff
- Remuneration: Climbing Mountain Guide, Liaison Officer, and Base Camp Staff.
- Medical & Emergency rescue Insurance for the Nepalese team.
- Necessary documentation, all government taxes, and agency service charge.
Cost Excludes:
- Accommodation in Kathmandu.
- International flight ticket.
- Beverages, hard drinks and alcohol.
- Nepal entry visa fee and airport tax during departure.
- Extra supporting staff, laundry, battery charge, and communication expenses.
- Personal expenses like tea, coffee, bar bill, drinking water, beverages, snacks, hot showers, etc.
- Travel and medical insurance, emergency evacuation/natural disaster, or personal reasons.
- In any case of natural calamities, mishaps, or anything beyond our control.
- Summit Bonus USD $700/- for each climbing guide & US$250/- for Base Camp Cook & kitchen helpers must be handed over in cash at base camp after the successful ascent of the peak. Also, please calculate some tips for the trek guide & porters.
Please feel free to ask any queries.
Q. What is the Ama Dablam Expedition?
A. The Ama Dablam Expedition is a Himalayan climbing adventure that takes experienced mountaineers to the summit of Ama Dablam, which is located in the Everest (Khumbu) region. The Ama Dablam Expedition is a technical Himalayan climbing adventure that takes place in Nepal. Ama Dablam, which is widely regarded as one of the most stunning mountains in the Himalayas, is a mountain that provides challenging rock, snow, and ice climbing in addition to taking in breathtaking Himalayan scenery.
Q. How difficult is the Ama Dablam Expedition?
A. The Ama Dablam Climb is a Himalayan expedition that is considered to be technically challenging and is appropriate for climbers with substantial experience. This route includes traversing glaciers, climbing steep rock sections, traversing exposed ridges, using fixed ropes, and climbing snow and ice in a technical manner. Climbers should have prior experience climbing at high altitudes and possess strong climbing skills and abilities in an alpine environment.
Q. What climbing experience is required for Ama Dablam?
A. Climbers attempting Ama Dablam should have experience with:
- High-altitude mountaineering
- Glacier travel and crevasse rescue
- Fixed rope techniques Rock, snow, and ice climbing
- Using crampons, ice axes, and climbing equipment
Previous experience on peaks above 6,000 meters is highly recommended before attempting Ama Dablam.
Q. How high is Ama Dablam?
A. The height of A. Ama Dablam is 6,812 meters, which is equivalent to 22,349 feet above sea level. It is one of the most famous and well-known Himalayan peaks, and it can be found in the Khumbu region of Nepal, which is part of the Everest region.
Q. Where is Ama Dablam located?
A. Ama Dablam can be found in the Everest (Khumbu) region of eastern Nepal, near the well-known villages of Namche Bazaar, Tengboche, and Dingboche. It is located near the traditional trekking route that leads to Everest Base Camp.
Q. What is the best season for the Ama Dablam Expedition?
A. The best seasons for the Ama Dablam expedition in Nepal are
- Spring (April–May): Stable weather, warmer temperatures, and optimal climbing conditions.
- Autumn (September–November): Clear skies, dry weather, and excellent mountain visibility.
These seasons provide the most favorable conditions for summit attempts.
Q. How long does the Ama Dablam Expedition take?
A. The typical itinerary for an Ama Dablam expedition lasts between 21 and 30 days, which includes arrival in Kathmandu, preparation for the expedition, trekking to Base Camp, acclimatization, climbing rotations, an attempt at the summit, and a return trip.
Q. What is the Ama Dablam climbing route like?
A. The Ama Dablam climbing route will take you through Sherpa villages, monasteries, and alpine landscapes before arriving at base camp. This route will take you through the beautiful Khumbu Valley approach. There are technical sections on the climbing route, including the following:
- Southwest Ridge climbing
- Steep rock sections
- Snow and ice slopes
- Fixed rope sections
- Exposed Himalayan ridges
Q. What equipment is required for the Ama Dablam Expedition?
A. Climbers need technical mountaineering equipment, including:
- Mountaineering boots
- Crampons
- Ice axe
- Climbing harness
- Helmet
- Ascenders and carabiners
- Down suit
- High-altitude gloves and clothing
- Sleeping bag suitable for extreme cold
- Personal climbing gear
Professional expedition support and technical guidance are essential for a safe ascent.
Q. Is Ama Dablam harder than Everest?
A. Although Ama Dablam is slightly lower than Mount Everest, it is considered to be more difficult from a technical standpoint in certain aspects. On the other hand, Ama Dablam requires advanced technical climbing skills due to its steep rock, ice sections, and exposed ridges, whereas Everest places more of an emphasis on altitude and endurance while climbing.
Q. Can beginners climb Ama Dablam?
A. The Ama Dablam mountain is not suitable for climbers who are just starting out. Because it is a technical expedition peak, it is necessary to have prior experience climbing in the Himalayas, to have excellent physical fitness, and to have advanced mountaineering skills.
Q. What views can be seen from the summit of Ama Dablam?
A. The summit of Ama Dablam offers spectacular panoramic views of some of the world’s highest mountains, including:
- Mount Everest
- Lhotse
- Makalu
- Cho Oyu
- Nuptse
- Thamserku
- Other Himalayan peaks of the Khumbu region
Q. How much does the Ama Dablam Expedition cost?
A. In Nepal, the cost of an Ama Dablam expedition can vary depending on the operator of the expedition, the services that are included, the size of the group, the permits, the logistics, the Sherpa support, and the duration of the trip. A comprehensive expedition package typically includes permissions, guides, lodging, transportation, base camp services, and climbing support.
Q. Why choose Ama Dablam for a Himalayan expedition?
A. Ama Dablam is one of Nepal’s most iconic climbing peaks, offering a perfect combination of:
- Technical alpine climbing
- Stunning Himalayan scenery
- Authentic Sherpa culture
- Challenging summit experience
- A legendary Everest region location
For experienced climbers, the Ama Dablam Expedition represents one of the most rewarding Himalayan adventures in Nepal.
Q. Is Ama Dablam a good preparation climb for 8,000-meter peaks?
A. It is true that Ama Dablam is frequently regarded as an excellent preparation for future Himalayan expeditions that are 7,000 and 8,000 meters in elevation. It is beneficial to climbers because it assists them in developing skills in technical climbing, altitude management, expedition strategy, and decision-making at high altitudes.